The Basics of Selling TPT Resources: 10 More Tips
You’ve started to figure out some of the basics of selling TPT products and how to navigate the Teachers Pay Teachers platform. There are just so many things to learn about selling your resources.
If you are like me, you have a question, you Google it, and then you scour a blog, forum, etc. until you can find the best solution.
Sometimes, finding the solution takes way longer than it should have. Or it’s so simple you really just want to kick yourself in the rear for not realizing it sooner. Don’t worry about that.
Happens to everyone at some point or another!
If you are just starting out and you haven’t read the first post for this series, you may want to go over the basics of selling teaching resources online.
This post is intended to help you with some of those questions that might be popping up. If you haven’t read it already, part one of basics of selling on TPT was covered in the blog post: Learn About Selling on TPT, as well as a free checklist in the member’s area. Sign up for the newsletter if you haven’t already to access all the goods!
1. Securing Documents
You have probably read about this one a few times. But how the heck do you go about securing a document. It depends on the document! If you are creating a Google Slides or PowerPoint, you will need to flatten your images. This means you save all your slides that are currently editable as JPG’s (picture files). Next, you place them all back into a presentation.
On Google Slides you can make it the background image so it can’t be moved around and on PowerPoint, you can lock the image so it can’t be moved. It can still be unlocked, replaced or deleted, but the important part is that the buyer can not take a piece of clipart and pull it off to use somewhere else without purchasing that clipart from the original creator.
If you are working with a PDF, you don’t have to go through the process of flattening and locking everything down. You can password protect the document and whoever needs to edit the document will need the password.
Don’t give this out.
They don’t need to edit it. You are the creator of the document. You control the changes. That’s part of the Terms of Use/TOU that you agree to when you purchase clipart, digital papers, frames, and fonts. It’s also the main reason you have to go through the process of securing everything. Unfortunate, but true.
2. Credit Page/Copyright
Make a credit page and respect copyright. The TOU of most graphic artists states that you can use their products for commercial content but only in certain forms and if you give credit. This means securing your documents (see #1) and giving proper credit for the elements in your project. If you use one artist’s paper for backgrounds, another artists borders, and a third artist’s fonts or clipart, you need to give credit to each artist.
The easiest way to do this is to create a credit page. Use it as a template and then insert it into each of your products. If you have ever purchased something from my shop, you will see me thank you page at the end of the document. It has links to all the artists whose product I used. Sometimes it even links to artists that are not necessarily in that document, but I don’t mind giving them the exposure 🙂
3. Pricing
You are almost ready to list your item. How much do you charge for it? It’s one of the most commonly asked questions.
The answer varies a little.
A good rule of thumb is between 10-20 cents per page. It depends on the complexity of the topic and how detailed each page is.
If it’s a quick worksheet that has average math equations on it and you didn’t have to go into much detail, it’s probably toward the 10 cent end of the scale.
If it’s a complex lesson with tons of details, higher level word problems, and it was time-consuming to make (and would be for any teacher) then you can shoot for the 20 cents per page end of the spectrum.
Clear as mud, right?
4. Great Covers/Pins
Eye-catching covers and Pins do most of the heavy lifting. It’s up to your cover/pin to catch someone’s eye and make them want to click-through to see the details. Bright. Clear. Easy to read titles. The rest you can have a little bit of creative freedom with.
Pins need to be longer, eye-catching (again) and if you can show the actual product in action you are sure to get more click-throughs and repins.
There are a majority of sellers who create their pins and covers using PowerPoint. You can change the size of your document. A cover should be square: 10in x 10in for example. Pins should be longer than they are wide. Pinterest recommends a size of 600 pixels by 900 pixels which translate roughly to 1.20 inches by 3.75 inches)

If you don’t want to use PowerPoint or the program that you create your products in, Canva is a great design app that you can use online. It saves your previous designs and you can also specify the size of your design (square, Pinterest, FB, etc.) You can import graphics so you can still make them visually appealing, fit your brand, and include your clipart.
Include your logo on each of your cover pages in the document and your main images for your listings. You want buyers to remember where those awesome products came from and how to find you again!
5. Links Within Your Listing
Creating links in your listings to similar listings or to items that are included in a bundle is a great way to upset your products.
TPT has updated the way to edit listings. The editor is now a WYSIWYG (what you see is what you get). You can highlight text, click on the link icon in the toolbar, and paste your listing link in the box. The editor takes care of the code for you.
If you are curious about the way it used to work or how the code operates in the background the following directions were the old way to add a link.
The way to do it with code (not needed on TPT anymore):
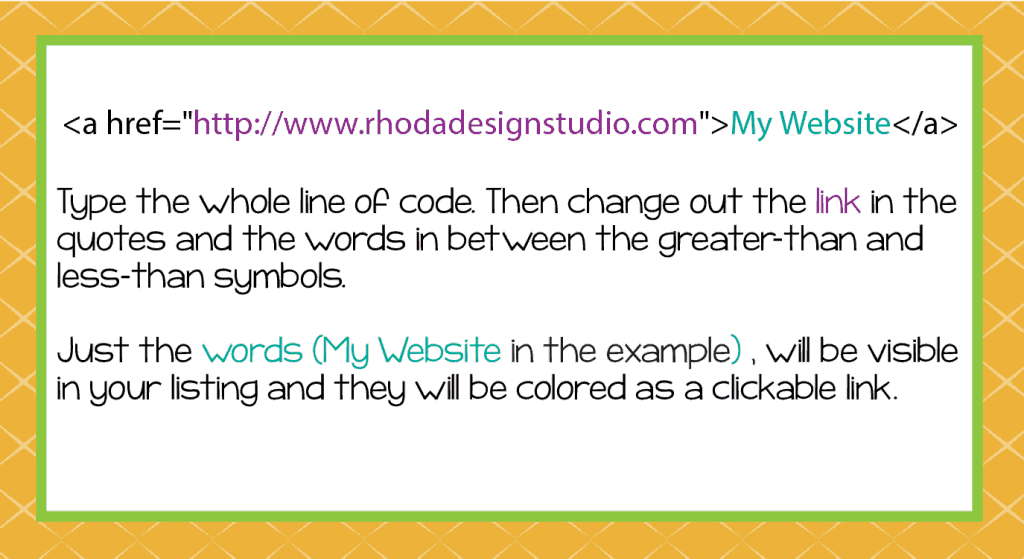
Instead of having a jumble of URL code messing up your clean listing, links can be made using HTML. It creates a link but is more visually appealing. The link to the listing is between the quotes. The clickable text is between the greater-than, less-than symbols.
In your listing, type this code once, insert the link, change the clickable text and then copy and paste to use again. Each time you need to make a link, just copy the code, replace the link and the text and you have a new clickable link that looks good too.
*this post contains affiliate links, please read my disclosure for more information
6. Keywords
Teachers Pay Teachers uses a search algorithm to determine which products should come up in a search. You can filter based on price, grade range, and product type. When you are writing your titles and description, the best advice is to use terms that your ideal customer would search for.
You don’t want to repeat that word or phrase over and over in an annoying manner. It needs to flow like a decent conversation or discussion. Think of words that a buyer might type in that are actually relevant to what you have created.
This is called SEO (search engine optimization) and is a great thing to learn to increase your searchability on the TPT site, on Pinterest, and on Google.
If you are struggling with ideas or similar words, Google has a keyword generator. Don’t stuff as many of these into the listing as you can, use them naturally in your description. This is probably one of the hardest things to get the hang of when you are starting to learn the basics of selling TPT products.
7. Pinterest for Traffic
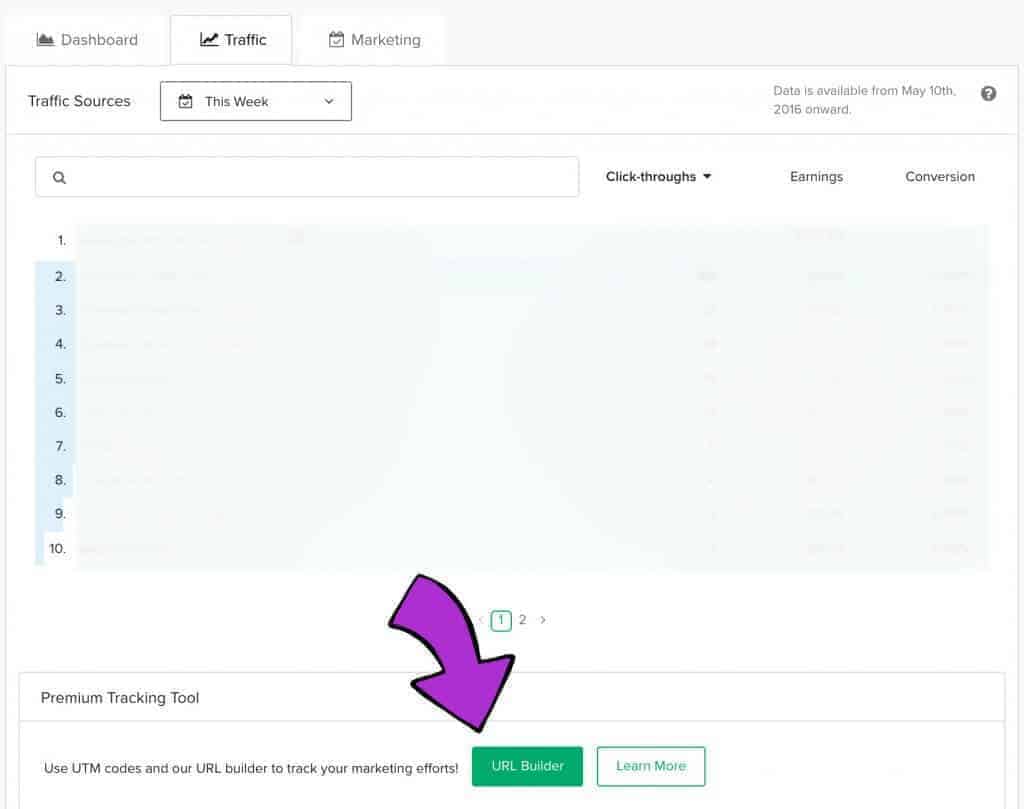
There is a large audience for Teachers Pay Teachers already. Directing a little more to your store is a good thing too. One of the best ways to do this is to pin products on Pinterest. (you can learn a lot of strategies that can help increase your traffic and sales) Your cover page is ok. A longer, well-designed pin is even better! If you want to bump it up a notch and see which pins are driving traffic to your shop, you can use the new Traffic URL Generator on TPT and make a custom link. Click-throughs will be labeled how you choose and you can see which pin is driving the most traffic!
8. Submitting to the Newsletter
It’s a little like playing the lottery…and when you hit the jackpot it’s amazing!! Submitting a paid or free resource to the newsletter is a great way to get more click-throughs, downloads of free products, followers, and feedback on your store and products.
There isn’t really a secret recipe or surefire way to get a listing selected, but it’s worth a try. There are directions on the sidebar. Pay special attention to the 10 pages or less (including credits and thank you page) for the free product and a price of $4 or more with some decent feedback ratings for the paid product.
Some sellers follow a routine of submitting once a week, on a Sunday so they don’t submit to frequently. Other than that, follow the directions on the sidebar and cross your fingers 🙂

9. Free to Paid Ratio
Giving away products to the community is fantastic. Giving away too much is not recommended (you know the cow and milk saying right?). A good rule of thumb is about 7-10% of your listings should be free. The easiest way to find this ratio is to take your number of free products and divide it by your total number of products. In my shop right now I have 12 free products and 139 total products. This equals .089 or 8% free. A good place to be. After a few more paid products, it will be time to come up with another amazing free product.
10. Previews
When listing a resource, you will notice a section that says preview file. This is NOT the place to just put your product file again. If you do that, you are essentially giving your product away for free because people can just download the preview file, print it and have your resource without completing a transaction.
The preview file needs to be a few pages that are a good representation of your product with the word “preview” over the top, that is secure or flattened. It’s completely possible to remove the “preview” from a file if it isn’t secured or flattened.
If it’s a huge resource you could put a file with just a few pages for free as the preview. You can also create a collage of your product pages that showcase what’s included but because they are smaller, overlapped, or covered with a “preview” watermark, they can’t be used without being purchased.
And there you have it. Ten more steps to help you through the basics of selling TPT products.
Read These Posts Next:
Market Your Site While Getting Your Hair Done
Increase Your Sales with These Courses

Great tips! thank you!
🙂
I create products for fun and personal use in my classroom, I would love to sell on TPT and get more creative. I had no clue where to start. Thank you so so much for the thorough information! I can’t wait to get started!
I’m glad you were able to find my post and get some information on how to get started selling on Teachers Pay Teachers. Feel free to ask any questions you may have along the way. Also, check out the “MEGA list of tips for selling on TPT” blog post. It has a lot more information to help you get started.
Once you get started selling on TPT, it will be one of the most rewarding things. Get started. You won’t be sorry 🙂
Rhoda